 OpenCode + General Compute
Run OpenCode on General Compute.
Add General Compute as a custom OpenAI-compatible provider, then drive coding agents — and multi-agent plan/build workflows — on purpose-built inference hardware. New accounts get $100 in free credit. Do the setup by hand or hand the prompts below to an agent.
Part 1
Installation & setup
Install or open OpenCode
Install OpenCode, then start the terminal UI with opencode or the desktop/browser UI with opencode web.
# Install OpenCode
curl -fsSL https://opencode.ai/install | bash

# Or install with npm
npm install -g opencode-ai

# Optional browser / desktop UI
opencode web
Get a General Compute API key
Create an account at app.generalcompute.com. New accounts receive $100 in free credit. Export the key as an environment variable so OpenCode can read it without it ever touching your config files:
# Export your key so OpenCode can read it
export GENERALCOMPUTE_API_KEY=gc-...

# Sanity check
opencode --version && [ -n "$GENERALCOMPUTE_API_KEY" ] && echo OK
Want an agent to handle the signup flow for you? Copy this prompt:
Sign me up for a General Compute API account and get an API key. Use https://docs.generalcompute.com/agent-signup for the signup flow. New accounts receive $100 in free credit. When you finish, return the API key and do not commit it to the repo.
Keep the key out of source control. The config below reads it from {env:GENERALCOMPUTE_API_KEY}.
Add General Compute as a custom provider
General Compute is not a listed OpenCode provider yet, so add it as an OpenAI-compatible custom provider. Use the UI or edit the config file — both produce the same result.
Option A — OpenCode desktop UI
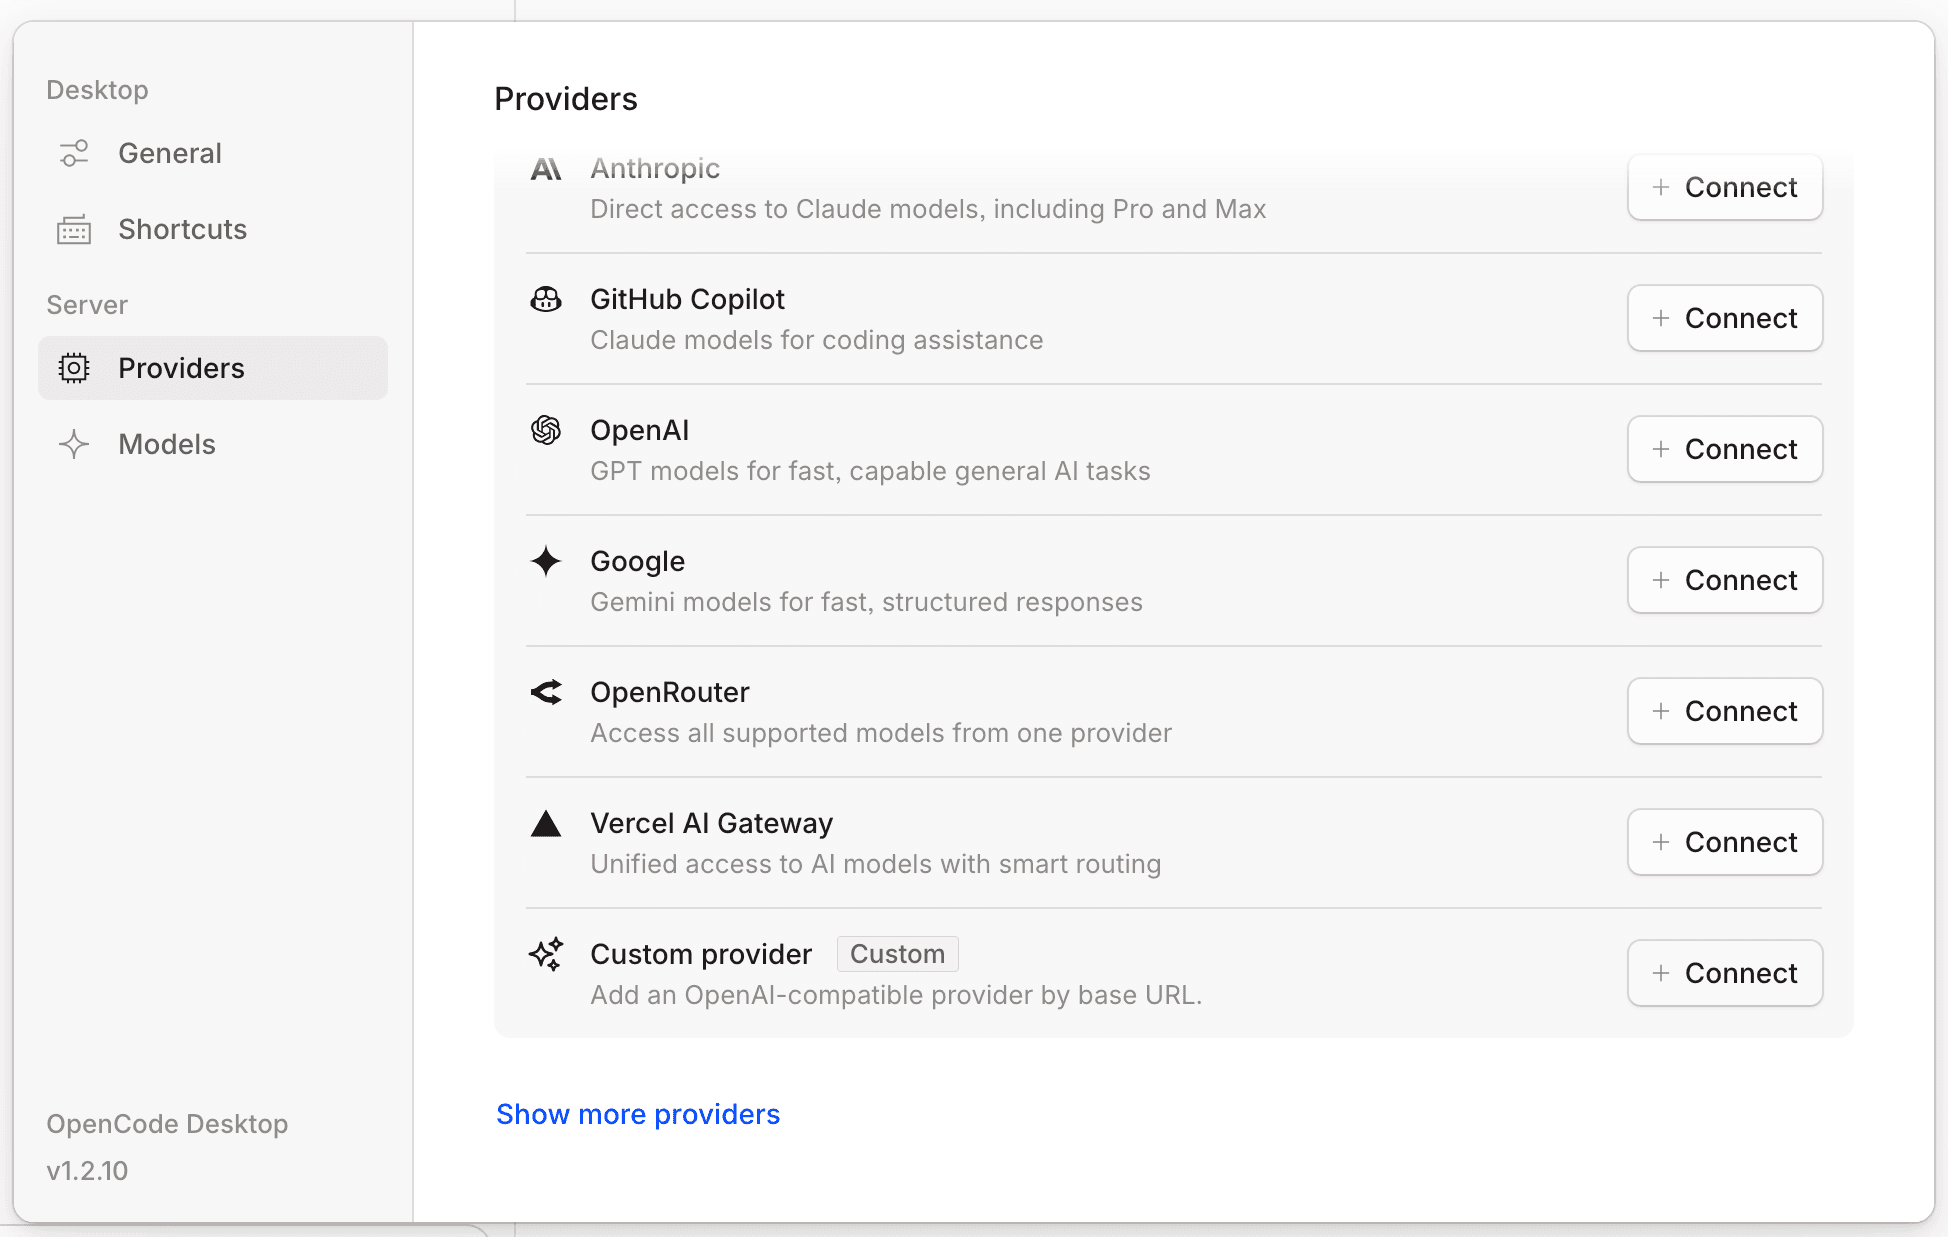
Open Settings → Providers, scroll to Custom provider, and click Connect.
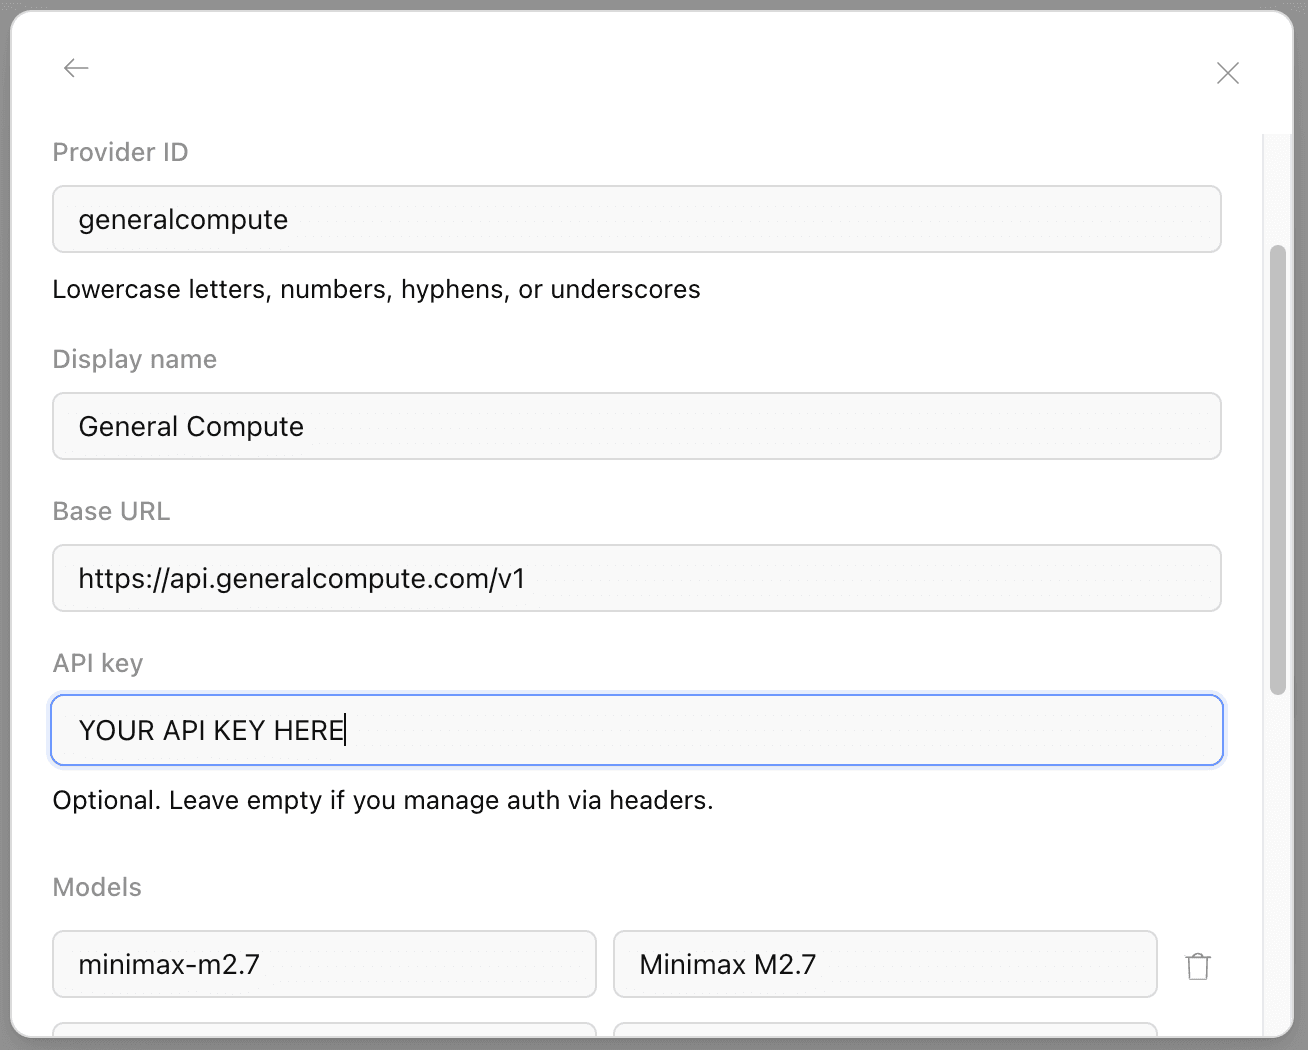
Fill the form with these values, then save:
- Display name: General Compute
- Base URL:
https://api.generalcompute.com/v1 - API key: your General Compute key
- Models:
minimax-m2.7,deepseek-v3.1
Option B — edit the config file
Update or create ~/.config/opencode/opencode.json with this provider block. The API key is pulled from your environment.
{
  "$schema": "https://opencode.ai/config.json",
  "provider": {
    "generalcompute": {
      "npm": "@ai-sdk/openai-compatible",
      "name": "General Compute",
      "options": {
        "baseURL": "https://api.generalcompute.com/v1",
        "apiKey": "{env:GENERALCOMPUTE_API_KEY}"
      },
      "models": {
        "minimax-m2.7": { "name": "MiniMax M2.7" },
        "deepseek-v3.1": { "name": "DeepSeek V3.1" }
      }
    }
  }
}Let an agent do the wiring
If you already have an agent with file-system access, hand it this prompt. It will update or create the global OpenCode config, wire the key from your environment, and start OpenCode.
Configure OpenCode to use General Compute.

1. Update or create ~/.config/opencode/opencode.json.
2. Read the General Compute key from the GENERALCOMPUTE_API_KEY environment variable — do not paste it inline.
3. Keep the provider id "generalcompute" unless I ask for a different local alias.
4. General Compute is not a listed OpenCode provider yet, so use the OpenAI-compatible custom provider package.
5. Start OpenCode and run /models so I can verify the provider appears.

Use this exact file content:
{
  "$schema": "https://opencode.ai/config.json",
  "provider": {
    "generalcompute": {
      "npm": "@ai-sdk/openai-compatible",
      "name": "General Compute",
      "options": {
        "baseURL": "https://api.generalcompute.com/v1",
        "apiKey": "{env:GENERALCOMPUTE_API_KEY}"
      },
      "models": {
        "minimax-m2.7": { "name": "MiniMax M2.7" },
        "deepseek-v3.1": { "name": "DeepSeek V3.1" }
      }
    }
  }
}Pick a model and run a test
Start OpenCode, open the model picker (or run /models), and select a General Compute model. These are good starting points:
minimax-m2.7
MiniMax M2.7
Main recommendation for OpenCode on General Compute.
deepseek-v3.1
DeepSeek V3.1
Longer-context DeepSeek option.
Or verify the endpoint directly with curl:
curl https://api.generalcompute.com/v1/chat/completions \
  -H "Authorization: Bearer $GENERALCOMPUTE_API_KEY" \
  -H "Content-Type: application/json" \
  -d '{
    "model": "minimax-m2.7",
    "messages": [{"role": "user", "content": "Hello from OpenCode"}],
    "stream": true
}'Part 2
Use sub-agents with General Compute
OpenCode splits work between a plan agent that designs and a build agent that executes. General Compute's fast inference is ideal for the high-volume build role — point build at a General Compute model and, optionally, a frontier model at plan. The three demos below build on each other in a single directory.
mkdir -p ~/opencode-gc-demo && cd ~/opencode-gc-demo && opencode
General Compute end-to-end
One General Compute model handles both planning and execution — no frontier dependency. Set build to a General Compute model and ask for a small site.
opencode.json
{
  "$schema": "https://opencode.ai/config.json",
  "provider": {
    "generalcompute": {
      "npm": "@ai-sdk/openai-compatible",
      "name": "General Compute",
      "options": {
        "baseURL": "https://api.generalcompute.com/v1",
        "apiKey": "{env:GENERALCOMPUTE_API_KEY}"
      },
      "models": {
        "minimax-m2.7": { "name": "MiniMax M2.7" }
      }
    }
  },
  "agent": {
    "build": { "model": "generalcompute/minimax-m2.7" }
  }
}Prompt
Create a minimalist, pet-friendly "hello world" landing page in this directory. One index.html, one style.css, no JS frameworks. Soft pastel palette, a friendly paw-print emoji, a short tagline ("Hello, friend"), and a single call-to-action button. Keep it under 80 lines of HTML+CSS combined. Open the file when done.Verify with open index.html.
Frontier plans, General Compute executes
A frontier reasoning model writes the plan into PLAN.md; the fast General Compute build agent executes every step. Great when a change spans dozens of edits.
Add a plan agent to the agent block
"agent": {
  "build": { "model": "generalcompute/minimax-m2.7" },
  "plan":  { "model": "anthropic/claude-sonnet-4-6" }
}1 · Plan agent
Read index.html and style.css in this directory. Elaborate a plan to extend this landing page into a "pet adoption finder" demo:
- A gallery of 6 placeholder pet cards (name, species, one-line bio) in a CSS grid.
- A search input that filters cards by name (vanilla JS, no frameworks).
- A dark-mode toggle that persists in localStorage.
Include the exact file layout, the JS event handlers needed, and a verification checklist. Don't modify any code yet.
2 · Build agent
Write the plan into PLAN.md and execute every step. After each step, list which acceptance criteria from the plan are now satisfied. Open index.html at the end so I can verify in the browser.
Switch agents with Tab (or the agent dropdown), then verify with open index.html.
MCP-fed planning with live library docs
The plan agent pulls current docs through an MCP server (Context7) and embeds them in PLAN.md, so the General Compute build agent works against up-to-date APIs instead of what the model remembers.
Export the MCP key
export CONTEXT7_API_KEY=ctx7sk-...
Add the MCP server to opencode.json
"mcp": {
  "context7": {
    "type": "remote",
    "url": "https://mcp.context7.com/mcp",
    "headers": { "CONTEXT7_API_KEY": "{env:CONTEXT7_API_KEY}" }
  }
}1 · Plan agent
Use the context7 MCP server to look up current docs for the date-fns library — specifically formatDistanceToNow with the addSuffix option, and how to load date-fns in a plain browser page via its UMD CDN build (the dateFns global) vs ESM named imports. Elaborate a plan for "Phase 2: relative date labels" describing how to give each pet card a fixed data-added ISO date and render an "Added X days ago" label from it on load. Use the up-to-date API from Context7 — not what you remember. Quote the exact <script> CDN tag, the global function call, and addSuffix usage verbatim from the docs, and include a verification step.
2 · Build agent
Update PLAN.md to include the "Phase 2" part and execute it. After loading, open index.html and confirm each card shows an "Added X days ago" label.
Each of the 6 cards should end up with an “Added X days ago” label. Verify with open index.html.
Tips & common gotchas
- Reference models as
provider/modelin the agent block — e.g.generalcompute/minimax-m2.7. - Keep the planner cheap to run often and the executor fast — a frontier plan agent only needs to run once per task, while build runs on every edit.
- Have the build agent commit PLAN.md and re-check acceptance criteria after each step, so a long run stays auditable.
Need help with the config?
Reach out at jason@generalcompute.com or open the full General Compute docs.